

骨格同士が関節に接合して動く表現をSwiftUIで実現する。対象者SwiftUIでの表現方法について知識を深めたいiPhoneアプリ開発者向け。チュートリアルからアイデアを得ているのでSwiftUIで何ができるのか興味を持っている開発者にも適している。
サンプルの動かし方を説明したのち、可動表現についての解説とSwiftUIでの実現方法を記述したのち、SwiftUIを使った場合の優れた点、それほどでもない点について説明する。
1) サンプル
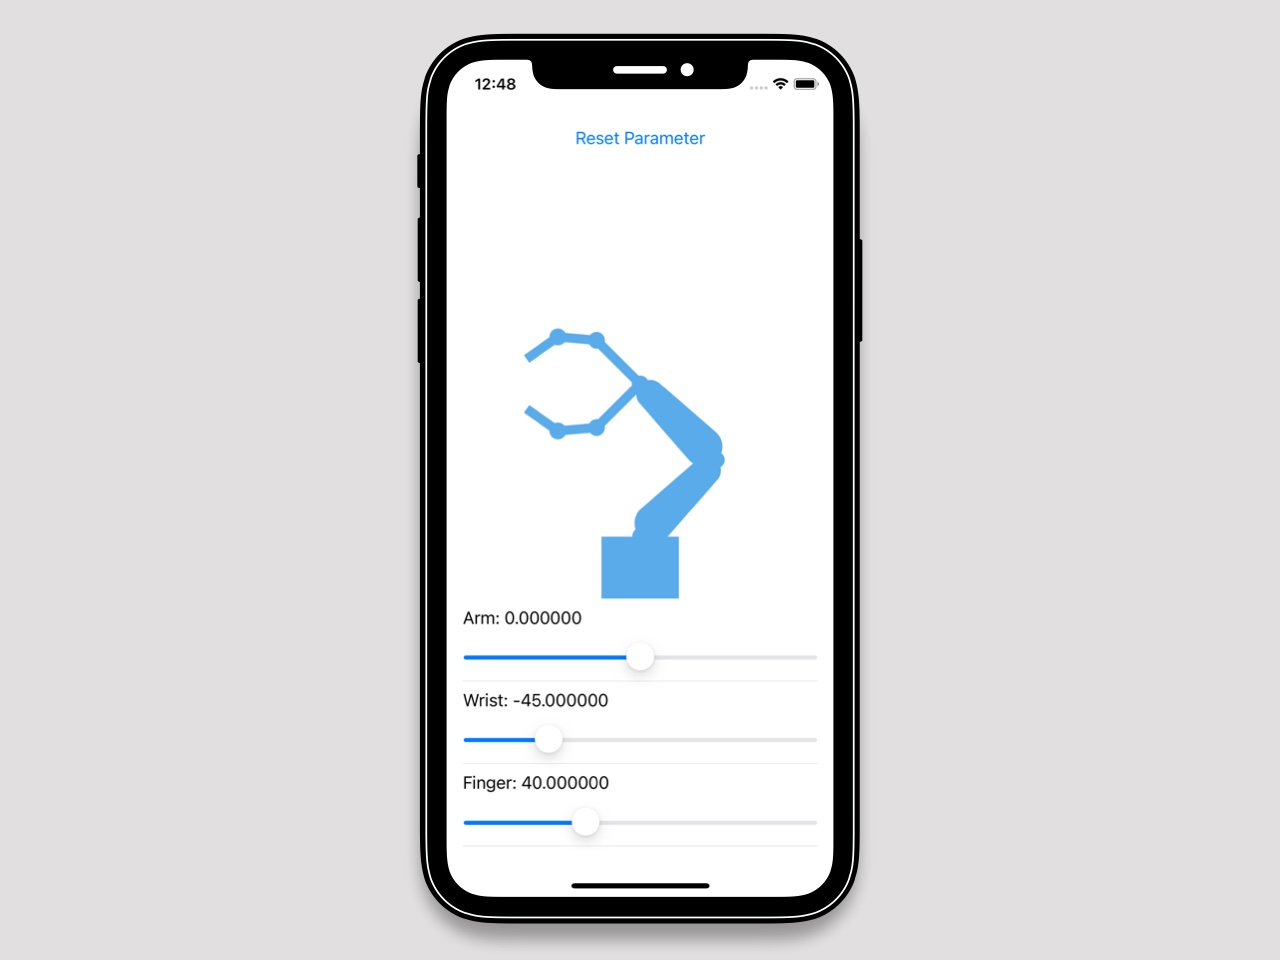
まずは動作を確認してみて欲しい。100行で実現してみた。動作確認方法はXcodeで新プロジェクトを作成する。プロジェクトウィザードはiOS - Appを選択、オプションとしてInterface - SwiftUI 、LifeCycleはいずれでも問題なし、LanguageにSwiftを選択しプロジェクト作成。作成されたソースコードを置き換えてビルドすると3つのスタイダー付きの機械アーム画面が表示される。スライダーを動かすと腕、手首、指を稼働させることができる。画面上のResetボタンをタップすると稼働部の初期値に戻る。
import SwiftUI

enum MechanicalArm {
    static let colors: [Color] = [Color(UIColor(red: 0.349, green: 0.671, blue: 0.914, alpha: 1.000)) /*.red, .green, .yellow, .blue, .yellow*/]
    static let manipulatorJointEdge = CGFloat(16.5); static let manipulatorRootEdge = CGFloat(37.5)
    static let manipulatorWidth = CGFloat(9); static let manipulatorFirstLength = CGFloat(60); static let manipulatorOtherLength = CGFloat(37.5)
    static let armLength = CGFloat(105); static let armWidth = CGFloat(37.5); static let armJointEdge = CGFloat(16.5)
    static let standWidth = CGFloat(75); static let standHeighth = CGFloat(60)
    static let defaultArmAngle = Double(0); static let defaultWristAngle = Double(-45); static let defaultFingerAngle = Double(40)
}

struct ArmShape: Shape {
    func path(in rect: CGRect) -> Path {
        let bezierPath = UIBezierPath()
        bezierPath.move(to: CGPoint(x: rect.maxX - 5, y: rect.minY + 14))
        bezierPath.addLine(to: CGPoint(x: rect.maxX, y: rect.maxY - 19))
        bezierPath.addCurve(to: CGPoint(x: rect.minX + 0.50000 * rect.width, y: rect.maxY), controlPoint1: CGPoint(x: rect.maxX, y: rect.maxY - 8.51), controlPoint2: CGPoint(x: rect.minX + 0.77614 * rect.width, y: rect.maxY))
        bezierPath.addCurve(to: CGPoint(x: rect.minX, y: rect.maxY - 19), controlPoint1: CGPoint(x: rect.minX + 0.22386 * rect.width, y: rect.maxY), controlPoint2: CGPoint(x: rect.minX, y: rect.maxY - 8.51))
        bezierPath.addLine(to: CGPoint(x: rect.minX + 5, y: rect.minY + 14))
        bezierPath.addCurve(to: CGPoint(x: rect.minX + 9.2, y: rect.minY + 4), controlPoint1: CGPoint(x: rect.minX + 5, y: rect.minY + 10.08), controlPoint2: CGPoint(x: rect.minX + 6.61, y: rect.minY + 6.54))
        bezierPath.addCurve(to: CGPoint(x: rect.minX + 0.50000 * rect.width, y: rect.minY), controlPoint1: CGPoint(x: rect.minX + 11.72, y: rect.minY + 1.53), controlPoint2: CGPoint(x: rect.minX + 0.39957 * rect.width, y: rect.minY))
        bezierPath.addCurve(to: CGPoint(x: rect.maxX - 5, y: rect.minY + 14), controlPoint1: CGPoint(x: rect.minX + 0.70347 * rect.width, y: rect.minY), controlPoint2: CGPoint(x: rect.maxX - 5, y: rect.minY + 6.27))
        bezierPath.close()
        return Path(bezierPath.cgPath)
    }
}

struct ContentView: View {
    @State var armAngle = MechanicalArm.defaultArmAngle
    @State var wristAngle = MechanicalArm.defaultWristAngle
    @State var fingerAngle = MechanicalArm.defaultFingerAngle
    func fingerView(length: CGFloat) -> some View {
        Rectangle().foregroundColor(MechanicalArm.colors[3 % MechanicalArm.colors.count]).frame(width: MechanicalArm.manipulatorWidth, height: length)
            .overlay(
                Circle().foregroundColor(MechanicalArm.colors[4 % MechanicalArm.colors.count]).frame(width: MechanicalArm.manipulatorJointEdge, height: MechanicalArm.manipulatorJointEdge)
                    .offset(x: 0, y: MechanicalArm.manipulatorJointEdge * 0.5)
            , alignment: .bottom)
    }
    static let manipulatorVector: [Double] = [1,-1]
    func manipulatorView() -> some View {
        Rectangle().overlay(ZStack(alignment: Alignment(horizontal: .center, vertical: .bottom)){
                    ForEach(0..<Self.manipulatorVector.count) { index in
                        fingerView(length: MechanicalArm.manipulatorFirstLength).overlay(
                            fingerView(length: MechanicalArm.manipulatorOtherLength).overlay(
                                fingerView(length: MechanicalArm.manipulatorOtherLength)
                                    .rotationEffect(Angle(degrees: -1 * Self.manipulatorVector[index] * fingerAngle), anchor: .bottom)
                                    .padding(MechanicalArm.manipulatorOtherLength)
                                , alignment: .bottom)
                            .rotationEffect(Angle(degrees: -1  * Self.manipulatorVector[index] * (80-fingerAngle) ), anchor: .bottom)
                            .padding(MechanicalArm.manipulatorFirstLength)
                         , alignment: .bottom)
                            .rotationEffect(Angle(degrees: Self.manipulatorVector[index] * (fingerAngle * 0.5 + 25) ), anchor: .bottom )
                    }
                }
            , alignment: .bottom)
            .foregroundColor(.clear).frame(width: MechanicalArm.manipulatorRootEdge, height: MechanicalArm.manipulatorRootEdge)
    }
    func mechanicalArmView() -> some View {
        ArmShape().foregroundColor(MechanicalArm.colors[1 % MechanicalArm.colors.count]).frame(width: MechanicalArm.armWidth, height: MechanicalArm.armLength)
            .overlay(
                Circle().foregroundColor(MechanicalArm.colors[2 % MechanicalArm.colors.count]).frame(width: MechanicalArm.armJointEdge, height: MechanicalArm.armJointEdge)
                    .offset(x: 0, y: 7.5)
            , alignment: .bottom)
    }
    var body: some View {
        VStack {
            Button("Reset Parameter") {
                withAnimation {
                    self.armAngle = MechanicalArm.defaultArmAngle
                    self.wristAngle = MechanicalArm.defaultWristAngle
                    self.fingerAngle = MechanicalArm.defaultFingerAngle
                }
            }
            Spacer()
            Rectangle().overlay(
                mechanicalArmView().overlay(
                    mechanicalArmView().overlay(
                        manipulatorView().foregroundColor(.red)
                                .rotationEffect(Angle(degrees: wristAngle), anchor: .bottom)
                                .padding(MechanicalArm.armLength)
                        , alignment: .bottom)
                        .rotationEffect(Angle(degrees: armAngle - 90), anchor: .bottom)
                        .padding(MechanicalArm.armLength)
                    , alignment: .bottom)
                    .rotationEffect(Angle(degrees: armAngle * 1.5 + 45), anchor: .bottom)
                    .padding(MechanicalArm.standHeighth)
                , alignment: .bottom)
            .foregroundColor(.clear).frame(width: MechanicalArm.standWidth, height: MechanicalArm.standHeighth)
            .background( MechanicalArm.colors[0 % MechanicalArm.colors.count])
            Group {
                HStack { Text("Arm: \(armAngle)"); Spacer() }; Slider(value: $armAngle, in: -45...45); Divider()
                HStack { Text("Wrist: \(wristAngle)"); Spacer() }; Slider(value: $wristAngle, in: -80...80); Divider()
                HStack { Text("Finger: \(fingerAngle)"); Spacer() }; Slider(value: $fingerAngle, in: 30...60); Divider()
            }
        }
        .padding(15)
    }
}
2) rotationEffectモデファイヤー
Apple謹製のSwiftUI TutorialのPathとShapeのチュートリアルはPathとShapeのチュートリアルだけでなくrotationEffectモデファイヤーの使用方法についても興味深い箇所がある。
Drawing Paths and Shapes — SwiftUI Tutorials | Apple Developer Documentation
rotationEffectモデファイヤーはSwiftUIに用意された回転効果を与える。ボタンやテキストフィールドを回転することは稀だが、チュートリアル中ではアプリアイコンをモチーフにした図形(シェイプ)を一定間隔で回転させながら配置することでオリジナルのバッジアイコンを作っている。
現実の机の上で紙で切り抜いた図形を手で回す、VR画面で図形を回す操作は一見シンプルな操作にみえるが人間は回転の中心を決めて図形を回している。rotationEffectモデファイヤーも同じく回転値と回転の中心をパラメーターとして渡す。
rotationEffectモデファイヤーのパラメーターを詳しくみていく回転値angleはSwiftUI で定義されているAngle構造体で角度(degree)か、ラジアン値(radian)のいずれかを渡すことができる。回転の中心anchorはSwiftUI で定義されているAngle、UnitPoint構造体で改訂したい対象の相対的な水平方向比率、垂直方向比率を渡す。UnitPointの比率指定でよく使う指定はUnitPointの静的変数として定義されておりもっぱら静的変数を利用することになる。
- .zero
- .center
- .leading
- .trailing
- .top
- .bottom
- .topLeading
- .topTrailing
- .bottomLeading
- .bottomTrailing
静的変数で水平歩行についての言及がない場合(.center〜.bottom)は水平方向は常にcenter扱いとなる。
3) 骨格同士が関節に接合して動く表現
骨格同士が関節に接合して動く表現について考える。何のことはなく人体の腕や手の動きであったり機械アームの動きっぽい動きである。
図のような長方形の短辺側に一定の角度で動く回転軸が用意されており、n個分接続されているのが基本構造となる。基本構造を長さや幅を変えることで腕や手首、指として機能させる。実際の人体のように腕の接続先を肩とにすると腕以下端末も連動した動きを表現できる。腕を可動部のない土台に固定すると機械アームも再現することができる。
骨格同士が関節に接合して動く表現の見た目は樹木の枝葉表現に似ている。関節に接合して動く表現と樹木の枝葉表現を分けるのはモーションの部分となる。
骨格同士が関節に接合して動く表現をもっともらしく見せるには、腕や指などは互いに連動するようにする。具体的には関節ごとに回転パラメーターを指、手首、腕に限定し指、腕の各関節は乗算、や定数を加えて稼働範囲が連動するように調整する。
人体だと連動した動きは腱(Tendon)によって作り出される。機械アームに腱はないが機械アームの中には人間の腕をある程度模倣しているので人間の腕の挙動を踏襲し見た目で受け手に伝えるようにすれば良い。
手首より先は人体と機械アームで違いが顕著で機械アームはマジックアーム形状が見受けられる。マジックアームは人体における親指と他の指で実現されるつまむ動作を簡素化したものと考えれば良い。
4) SwiftUI で表現を実現する
rotationEffectモデファイヤーを使うと図形を回転できることは判明している。ここまでで表現に足りない要素を記述すると、
- 肩、腕、手首、指は根元になる要素に連動する
- 回転の中心の指定方法
1は、Viewのoverlayもでファイヤーを使用する。overlayモデファイヤーは文字通りViewの上に配置されるViewを指定できViewの回転と連動する。デフォルトの元Viewに対しての揃えは.center(水平垂直ともに中央)となる。土台のoverlayとして最初の腕と関節と定義、最初の腕と関節のoverlayとして2番目以降の腕を定義する階層構造でで実現できる。
2は実現に少し悩んだが以下の方法で解決できる。基本構造が接続される先を親、基本構造を子とすると、
- 親 - overlayを指定する際の揃え属性を.bottom(水平中央、垂直下揃え)指定
- 子 - 角度をつけたいオブジェクトの.paddingモデファイヤーで親の高さを指定
となる。.paddingモデファイヤーで指定した埋めサイズは回転の影響を受けない利点特性がある。
まとめ
サンプルについて説明してきたが最後に優れた点とそれほどでもない点について記述する。
優れている点(Pros)
SwiftUIの特徴である軽量なViewでハードウェアの負荷を抑えて見栄えが良い表現が実現できる 整理された回転指定、iOPとmacOSの違いを気にしなくても良い
それほどでもない点(Cons)
物理エンジンには非対応。物理演算ゲーム用途にはSpriteKit、SceneKitを使用した方が良い 関節が増えるほど記述が冗長化する。高階関数を導入するなど改善点を検討した方が良い

